IDE (Integrated development environment) is a software development platform which provides all the necessary tools to developers for software development. A typical IDE consists of a source code editor, build system, compiler/ interpreter, debugger, uploader and serial monitor.
Arduino IDE is a commonly used IDE among hobbyists, tinkerers and researchers[1]. The IDE is simple too use and board select provides easy options to integrate the boards which are even outside the Arduino world (like Raspberry, ESP32[2], STM32[3] etc). The IDE consists of source code editor, compiler, language support, build system, debugger, and serial monitor. The source code editor in Arduino IDE is known as Sketch book, where option of creating multiple sketches, editing and saving is available. Arduino IDE uses a GNUCC (GNU compile collection) as compiler which is a open source compiler created by GNU and distributed under BSD -3 clause permissive license.
Sketch build process is comprised of multiple steps taken from writing/editing the source code to uploading it to a microcontroller board. Main tasks are generating build script, managing dependencies, configuring build options, defining build targets and cross-compiling. Arduino has explained their build process stepwise in their documentation [4], [5]. A summary of these steps are shown in the block diagram below.
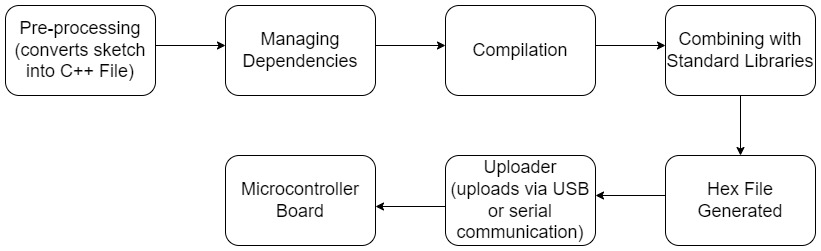
Pre-processing is done to convert the .ino files into .cpp file. If header file is not included, #include<Arduino.h> is added which includes all the Arduino core standard definitions required for the program. An important thing to notice is that if the sketches have any other extension than .ino and .pde, they don’t go for preprocessing.
Dependency Resolution is an important step in the build process where all the dependencies in the sketch is scanned recursively and then searched to predefined paths: Core Library folder, Variant Folder, system directories, included search paths. If the dependency is not present in these paths, then it is searched in installed libraries. It makes a file with .d extension which will comprise of all the dependencies.
Next step is compilation of sketch where the sketch is compiled (GCC for Arduino boards) for any selected board. A sketch might not work which is compiled for a different board. In the Arduino IDE a tick button is provided to compile. Compiler uses the .cpp file (generated from preprocessing where .ino/.pde sketch was converted to .cpp), .c and .S files to generate a .o extension file. An important step is taken to save time if there is already .o extension and .d extension file available with timestamp newer than the source code (means no changes from previous compilation).
Final .hex file is created by linking the .o file with static libraries. It removes the part not required in sketch to reduce the size of file to be uploaded on board. This .hex file is considered to be the final output of compiler which is to be uploaded on board.
For uploading the .hex file, a button named upload with symbol of a front arrow is provided on top panel of the IDE. For Arduino boards the used uploader is called avrdude.
References:
[1] https://docs.arduino.cc/software/ide-v1/tutorials/arduino-ide-v1-basics#serial-monitor
[2] https://randomnerdtutorials.com/installing-the-esp32-board-in-arduino-ide-windows-instructions/
[3] https://www.sgbotic.com/index.php?dispatch=pages.view&page_id=48
[4] https://arduino.github.io/arduino-cli/0.20/sketch-build-process/
[5] https://arduino.github.io/arduino-cli/0.20/platform-specification/
